Most homeowners see construction as a single, continuous blur of activity. Concrete gets poured, walls go up, and eventually there's a finished house. But behind that result is a structured sequence of stages — each with its own quality checkpoints, material requirements, and risks if rushed.
In this post, we walk through a live AEDO Construction residential project in the Philippines — showing you exactly what each stage looks like on the ground, what to inspect, and what to watch out for as a homeowner or property developer.
The 6 key construction stages · What quality checks to demand at each phase · Common mistakes that cost homeowners money · How long each stage takes in the Philippine context.
Every properly managed house build follows a logical sequence. Skipping or rushing any stage creates compounding problems that are expensive — or impossible — to fix later.
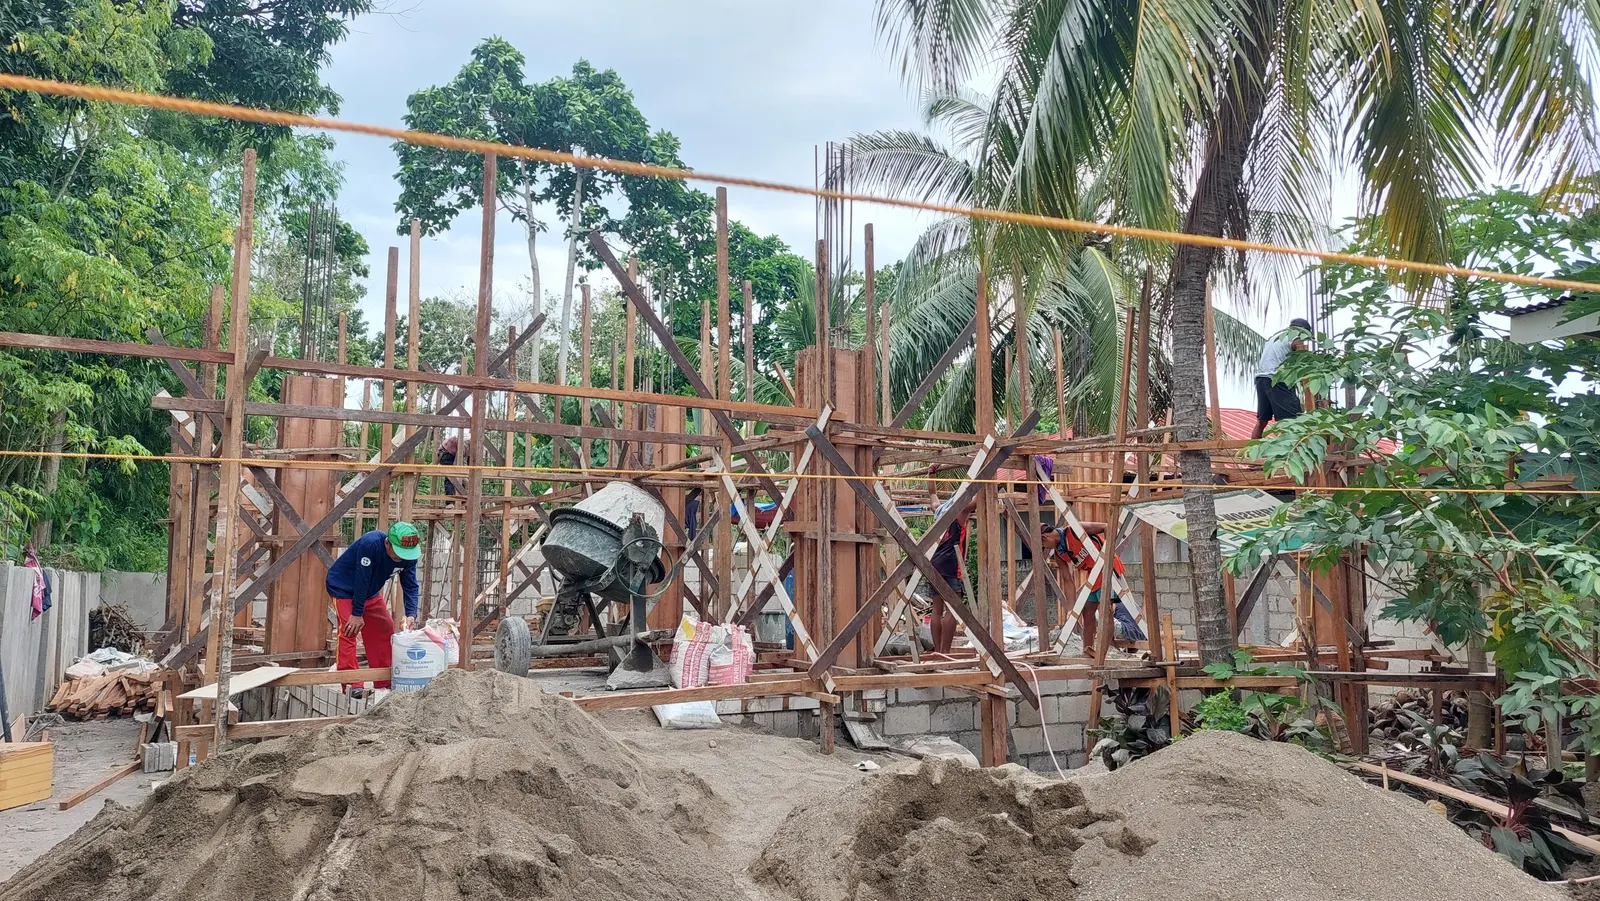
Column forms being erected. Note the cross-bracing on the scaffolding and the reinforcing steel rebar protruding from the column tops — these are dowels that will tie into the next floor's columns.
This is the most critical stage of the entire build. Columns are the spine of a reinforced concrete structure — every load in the building travels through them to the foundation. Errors here cannot be patched; they must be demolished and rebuilt.
What you're seeing in the photo: wooden formwork (falsework) assembled around pre-positioned rebar cages. Concrete will be poured into these forms, cured, and kept supported until it is strong enough: side forms after about 12 hours, slab props typically about a week and beam props about two weeks, as the engineer directs, before vertical loads go on.
The stacks of cement bags (visible: Titan, Holcim Portland) and sand pile in the foreground are for the concrete mix. A drum-type mixer handles batch mixing on site — standard practice for Philippine residential projects.
Common mistake: Homeowners sometimes allow contractors to reduce rebar count or use smaller-diameter bars to "save cost." A Ø12mm bar where a Ø16mm bar was designed changes the structural capacity of the column. Never approve rebar substitution without consulting your engineer.
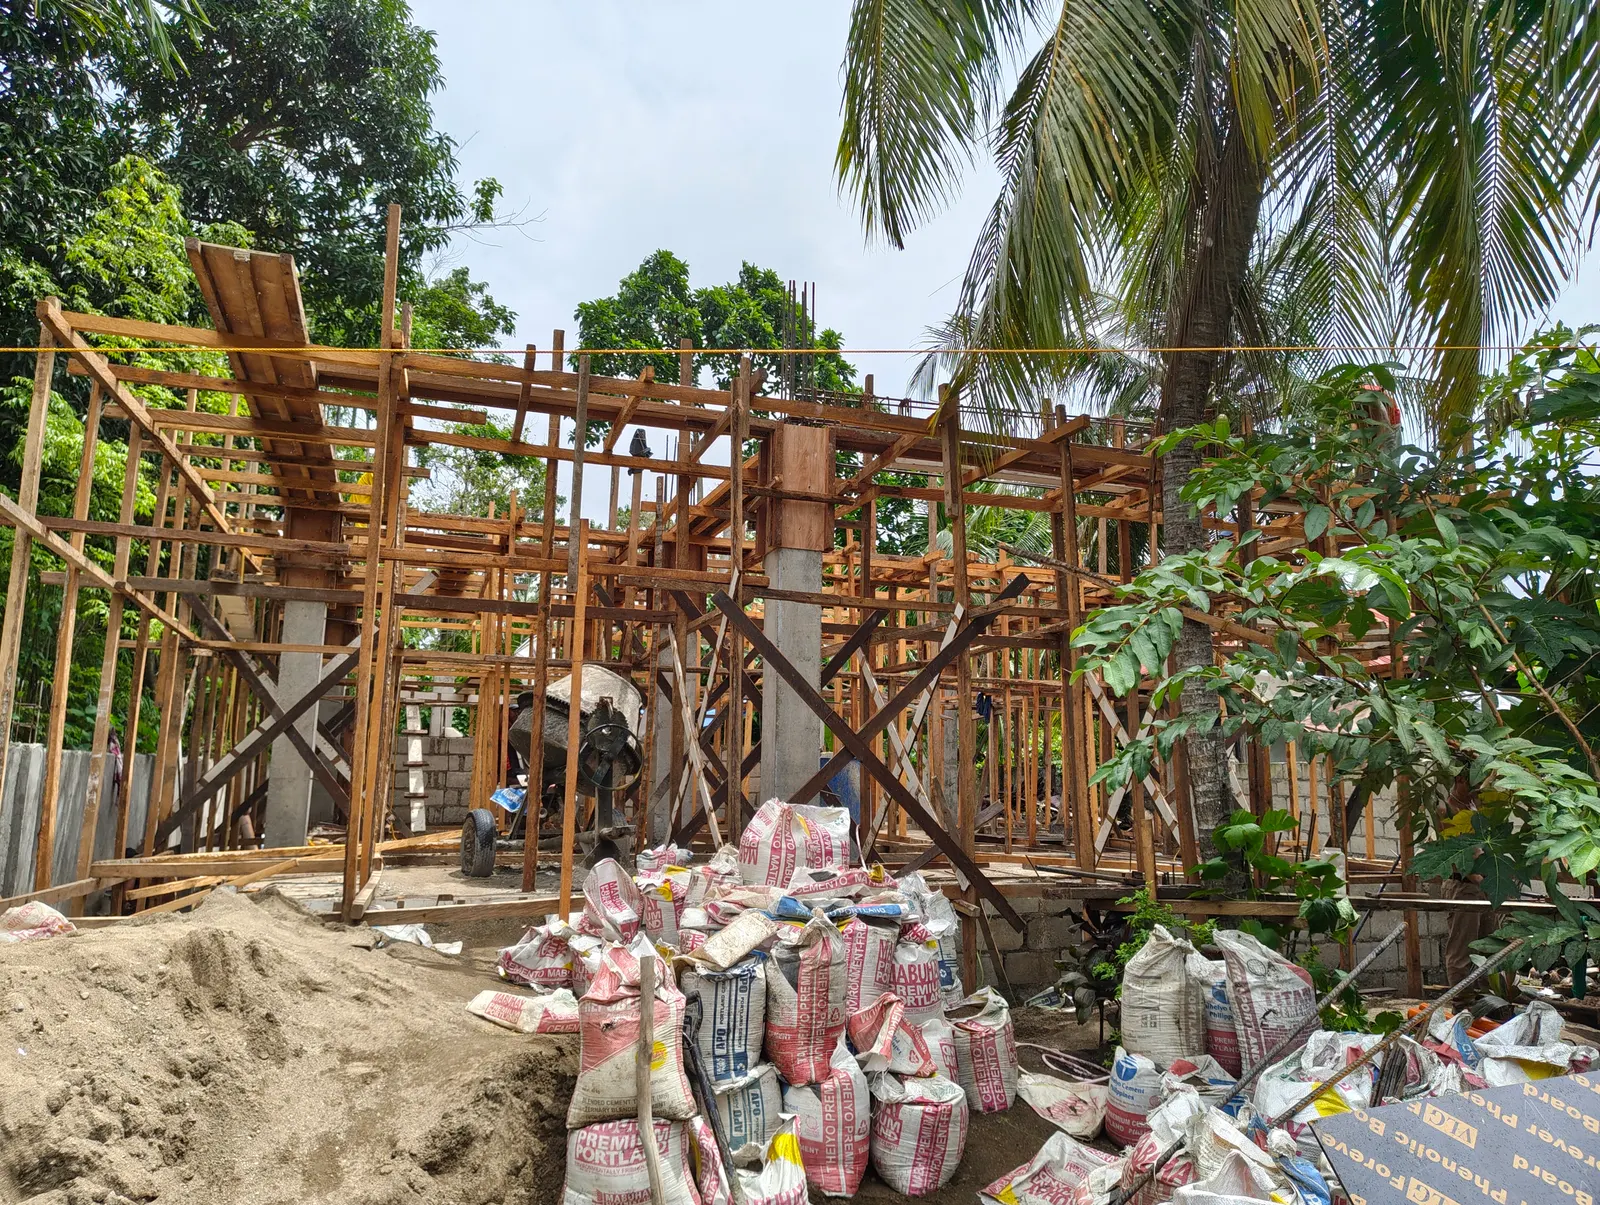
CHB walls being built alongside active column pours. The drum mixer runs continuously as the crew works — efficient use of labor and equipment on a well-managed site.
While column formwork cures, the crew begins masonry — laying Concrete Hollow Blocks (CHB) to form the exterior and interior walls. In Philippine construction, CHB is the dominant wall material: affordable, widely available, and appropriate for the tropical climate.
Good masonry is more than stacking blocks. Wall reinforcing bars must be embedded in the mortar joints (vertical and horizontal steel) and column-to-wall ties must be properly anchored. These details determine how the wall performs under wind and seismic loading.
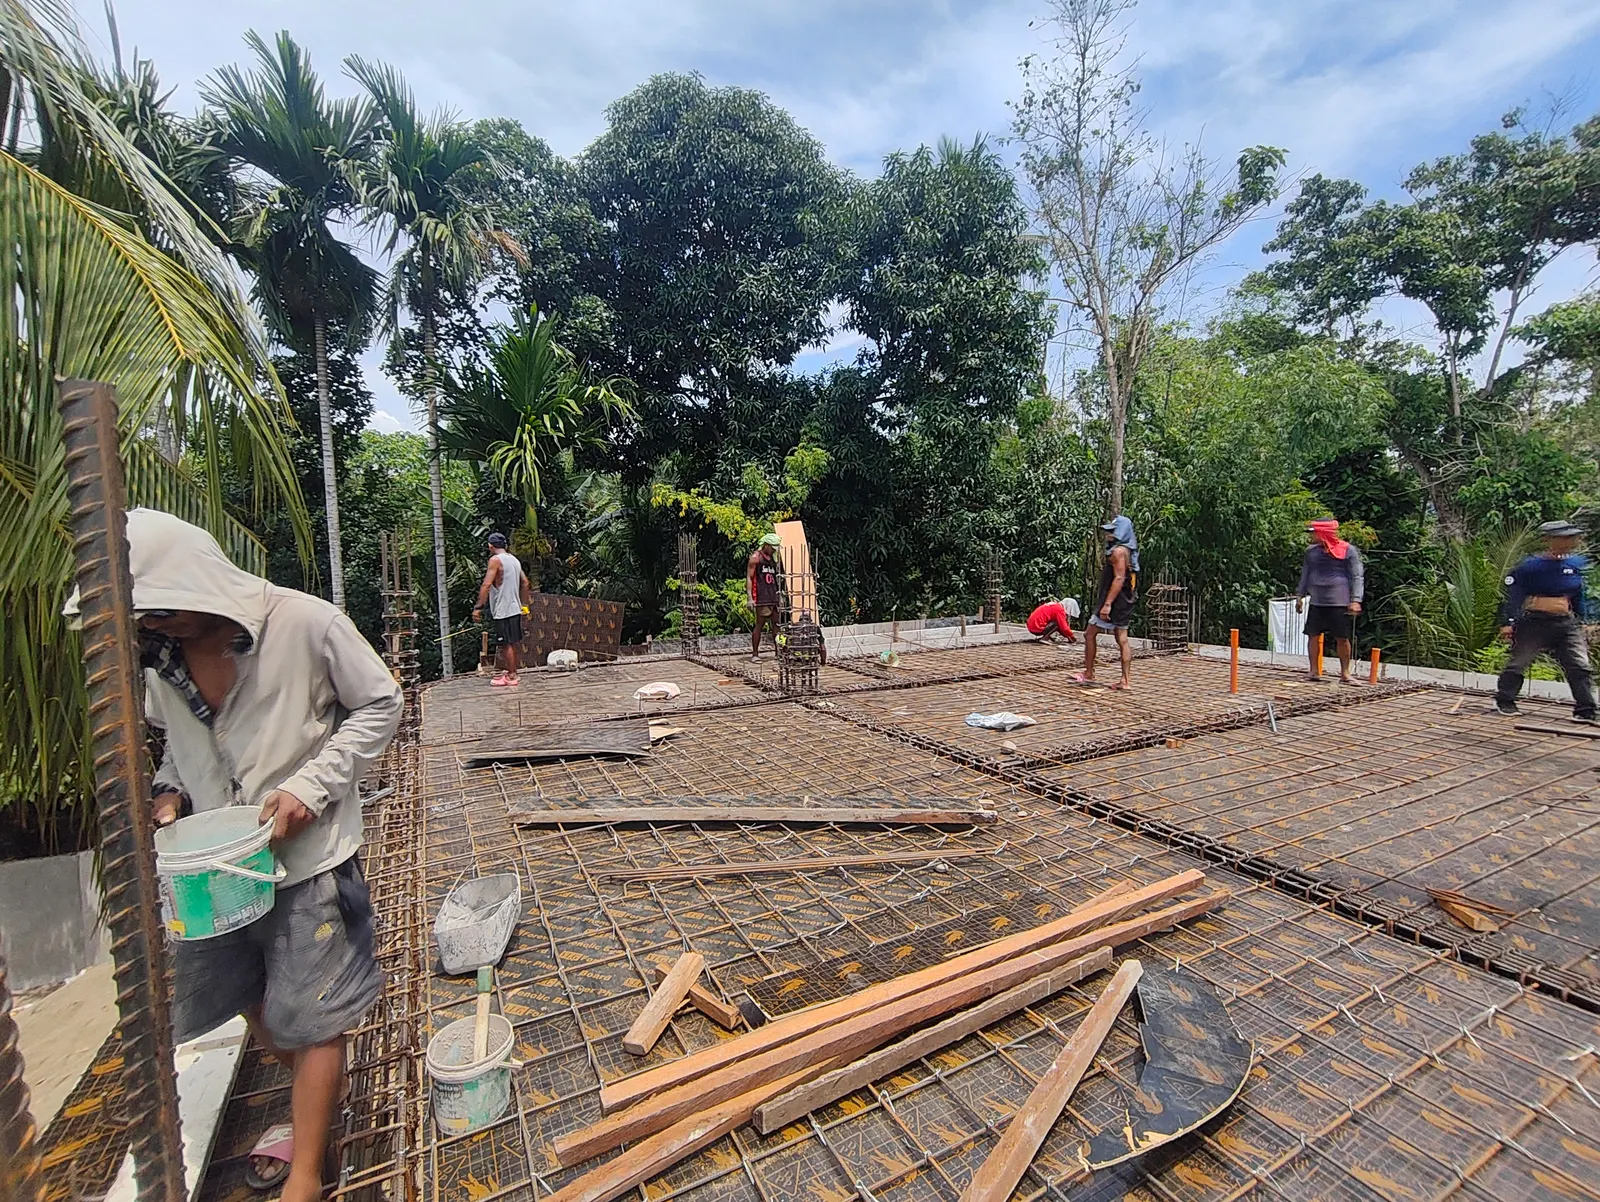
The two-way rebar grid for the elevated slab (2nd floor deck) is fully laid out and tied. Workers are doing final checks and applying concrete spacers before the pour begins.
For two-storey construction, this is arguably the most consequential pour in the entire project. The elevated slab carries the dead load of the second floor, all live loads (occupants, furniture), and must transfer lateral seismic forces to the columns below.
The photo shows a two-way reinforced concrete slab — steel running in both directions, tied at every intersection. The orange spacers (concrete cover blocks) visible at the edges ensure the steel is correctly positioned relative to the bottom face of the slab. Cover is critical: too little cover leads to corrosion of the steel within years.
Why the slab pour needs a supervisor on-site: Concrete must be continuously placed and vibrated without cold joints. A pour that stops mid-slab creates a structural weakness. Have your engineer or a trusted foreperson present for the entire duration.
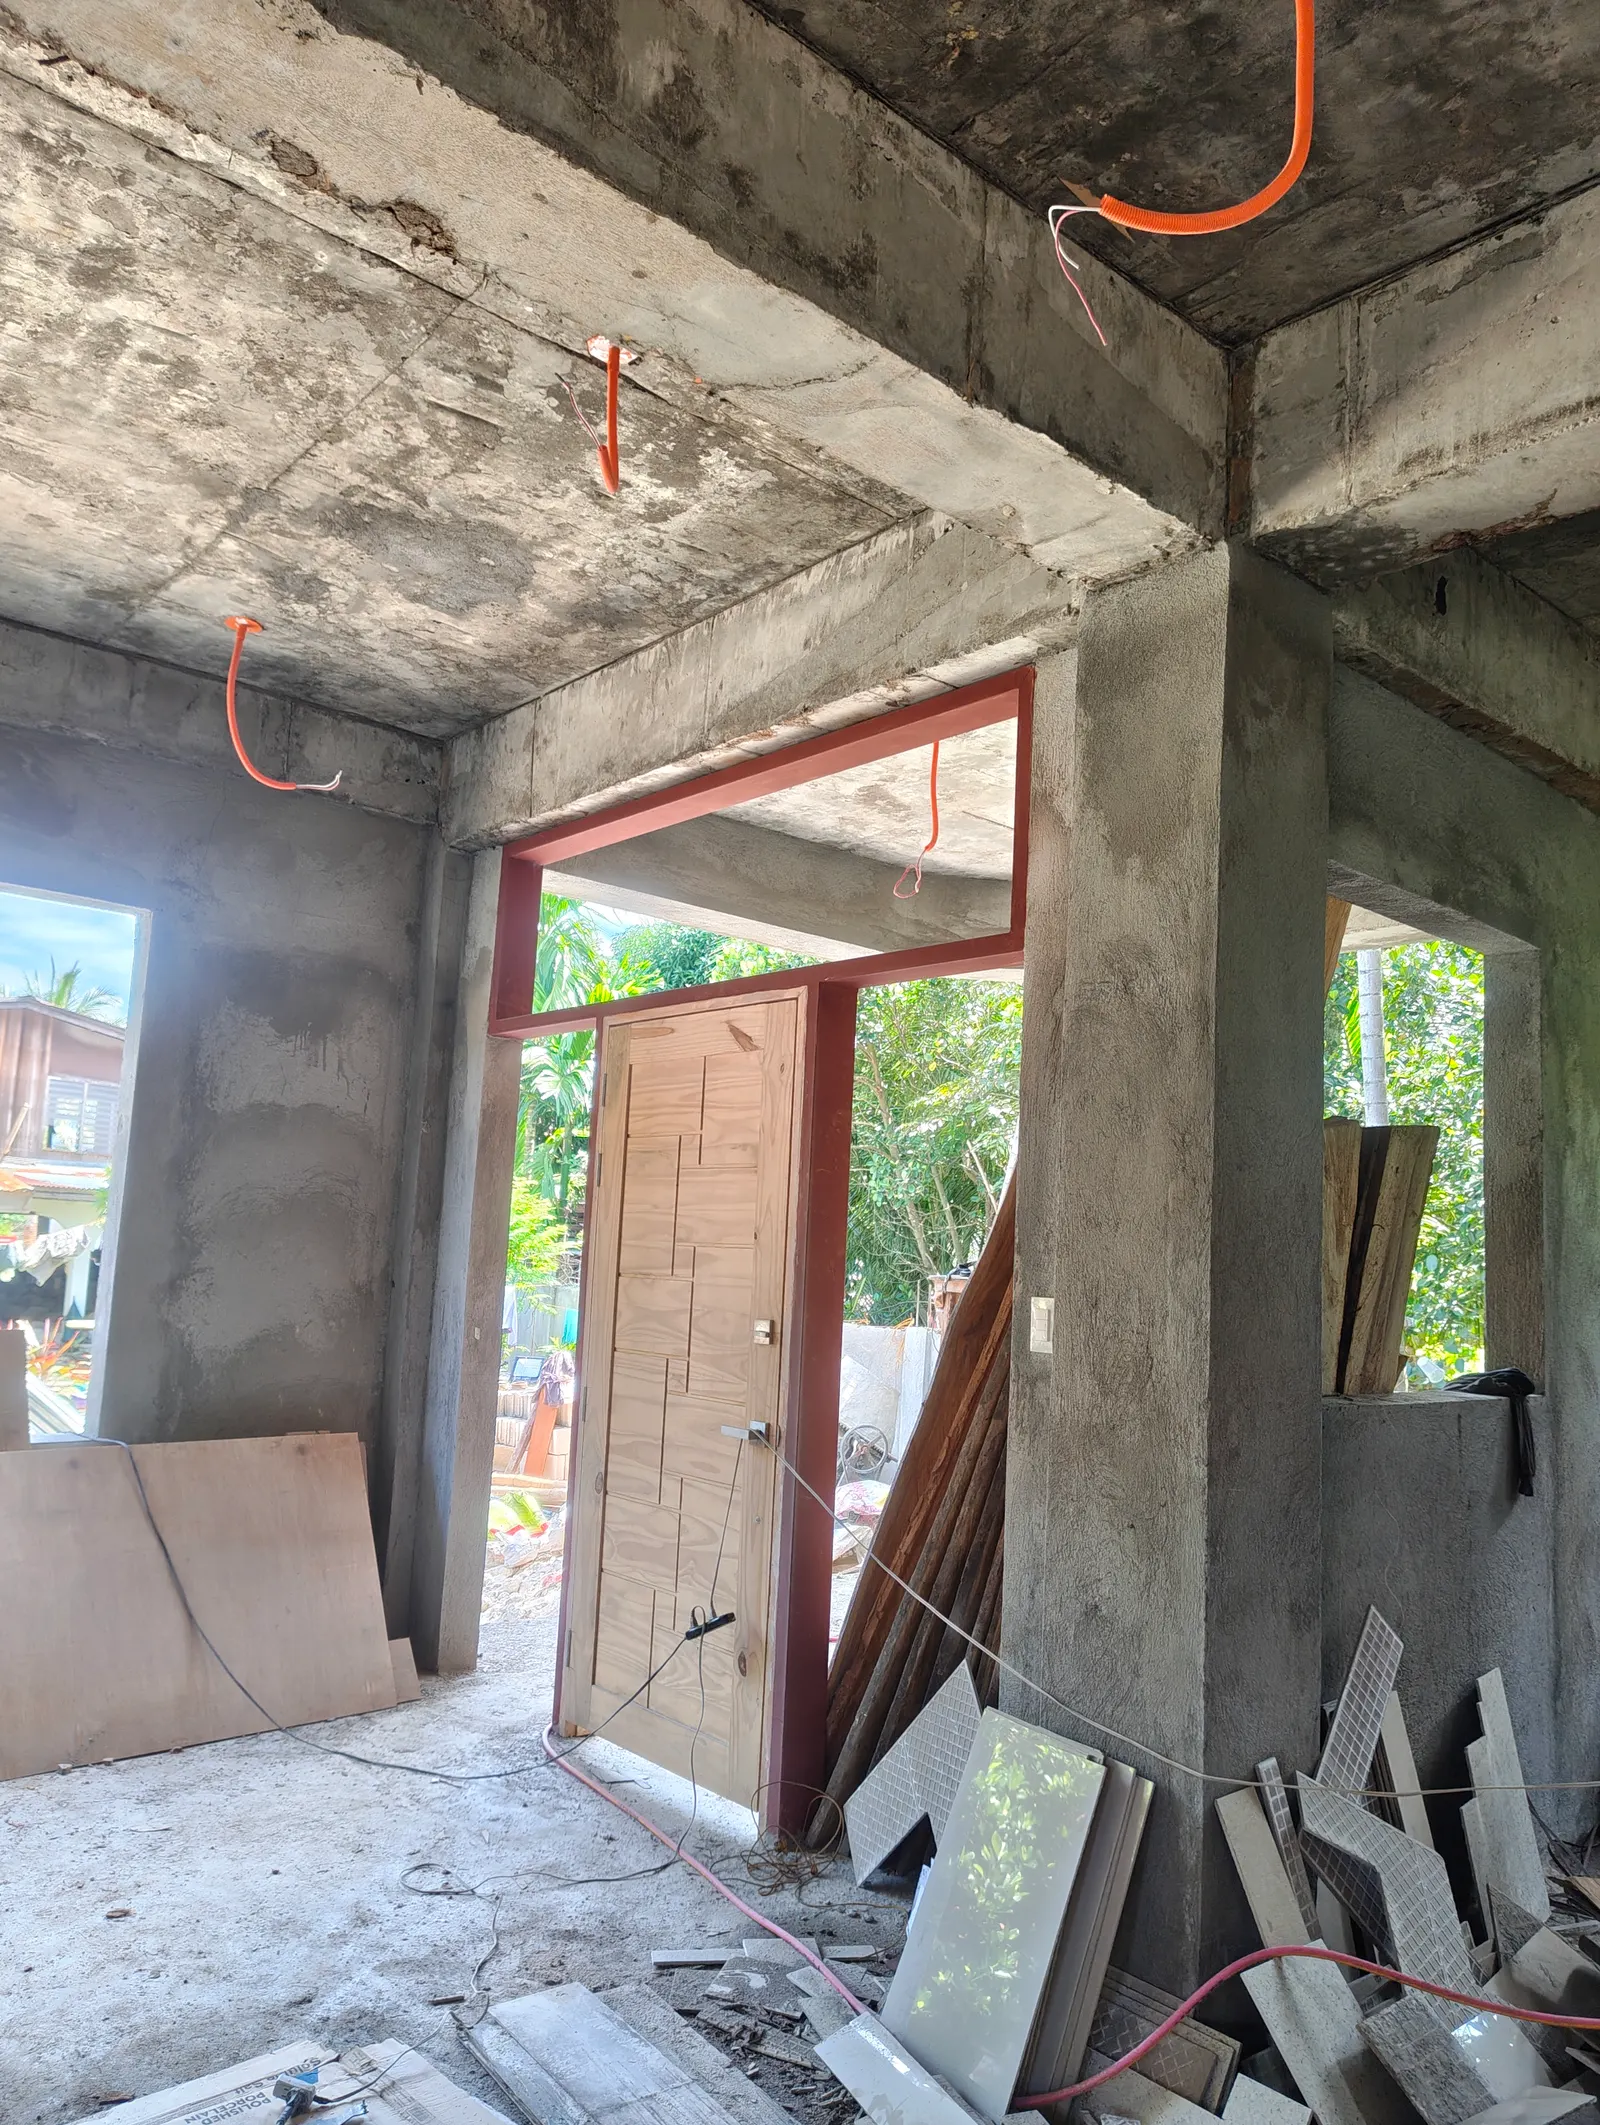
Orange PVC conduits running through the concrete beams and walls. The steel door frame is already set in the opening — correct sequence, since door frames must be set before walls are plastered.
Before plastering begins, all mechanical, electrical, and plumbing (MEP) rough-in must be complete and inspected. This is the last chance to add or adjust wire runs and plumbing lines without tearing open finished walls.
The orange PVC conduits visible here are the correct material for Philippine residential electrical — rigid and liquid-tight conduit embedded in concrete or masonry, protecting the wire inside. You can see conduit stubs pointing downward from the ceiling beam — these will be connected to junction boxes as the ceiling is installed.
The steel door frame (pre-finished in oxide primer red) is already set in the main entrance opening. Frames must be installed at this stage and anchored to the concrete or masonry before plastering — not fitted after finishing, which results in poor integration and gaps.
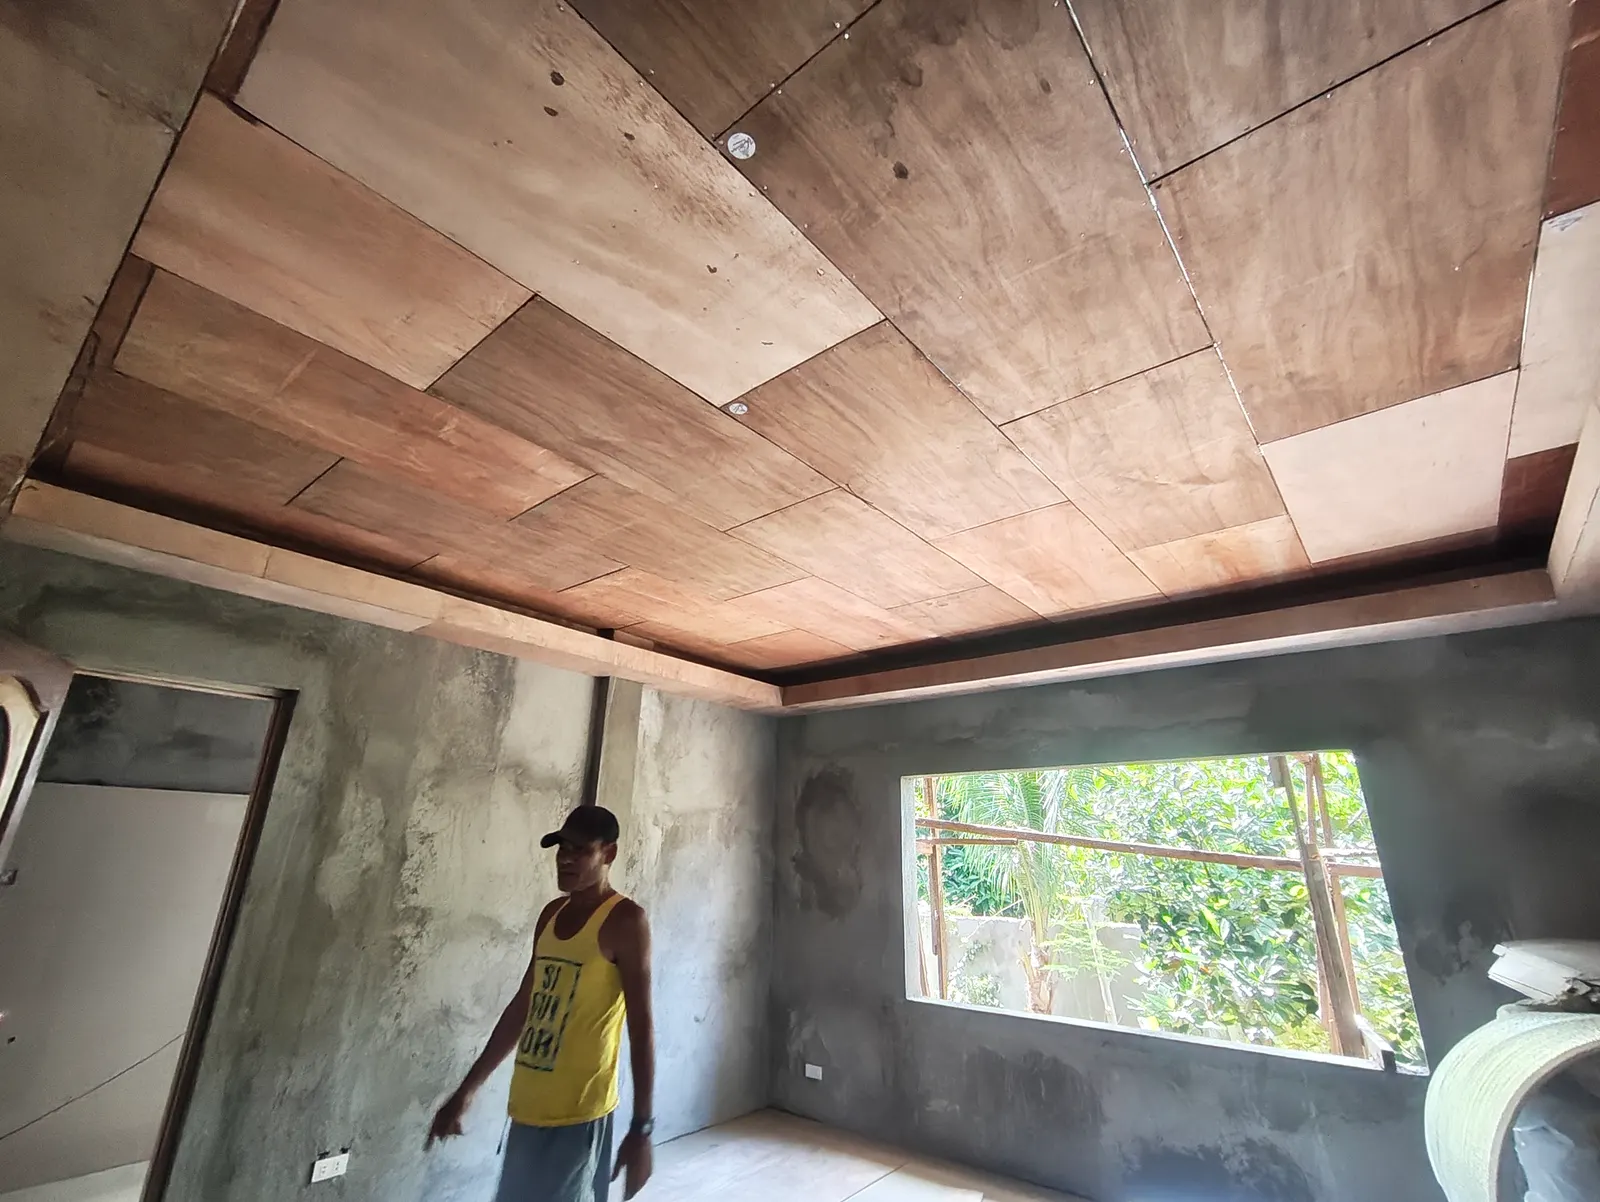
A completed bedroom: plywood ceiling with recessed lighting, fully plastered walls with a smooth skim coat, and a large picture window framing the garden. This room is ready for painting and floor tiles.
This stage transforms the structural shell into a livable space. Walls receive a base plaster coat (scratch coat), followed by a finish coat that is floated smooth. Ceilings are typically framed in lumber or light gauge steel, with plywood (as shown here) or fiber cement board as the face material.
The ceiling in the photo uses a stepped or cove detail at the perimeter — a design feature that adds visual depth to the room and hides the LED strip or cove lighting behind the ledge. This is a detail AEDO plans during the architectural stage, not improvised on site.
Note the large picture window — properly sized and positioned to maximize ventilation and natural light in a tropical climate. Passive ventilation is not just comfort; it reduces long-term energy costs and extends the life of the building envelope.
For a standard two-storey residential house (120–160 sqm gross floor area) with a crew of 8–12 workers:
| Stage | Duration | Notes |
|---|---|---|
| Site prep, excavation, footings | 3–4 weeks | Depends on soil condition and footing depth |
| Ground floor columns & walls | 4–6 weeks | Includes curing time; column forms come off after about a day and curing continues |
| Elevated slab (forms, steel, pour, cure) | 4–5 weeks | Props stay until the engineer releases them (typically about 1 week for the slab, 2 for the beams) |
| Second floor columns & roof beam | 3–4 weeks | |
| Roofing system | 2–3 weeks | |
| MEP rough-in (electrical, plumbing) | 2–3 weeks | Runs parallel with masonry where possible |
| Plastering, tiles, ceilings | 6–8 weeks | Largest labor-hour stage; do not rush |
| Painting, fixtures, punch list | 3–4 weeks | |
| Total (typical) | 10–14 months | Including permits, design, and seasonal delays |
The table above is a standard 120–160 sqm two-storey house. Yours is a different size, a different finish level, and — the part that moves the answer most — at a different point in the permit process. This works your own programme out, stage by stage, and shows you where the time actually goes.
Builds a realistic programme from the stage durations in the table above, adjusted for your floor area, storeys, finish level and — the big one — how far along the permit and design already are.
Concrete keeps gaining strength well past day 7, and the 28-day value is what f'c is tested against. Stripping props too early or loading a young slab can crack it or leave a permanent sag. This is one of the most common shortcuts on budget or rushed projects and one of the most dangerous.
Many homeowners hire only an architect, leaving structural design to the contractor's "experience." In a country with Seismic Zone 4 conditions and annual typhoon exposure, this is a serious risk. PD 1096 requires the structural plans submitted for a building permit to be signed and sealed by a licensed civil engineer — it's not optional. An engineer's fee is a fraction of the cost of rebuilding a failed structure.
Every change order after structural works begin has a multiplied cost — removed concrete, repositioned steel, patched walls. Design changes during construction are the single largest driver of budget overruns. Finalize all architectural and structural decisions before breaking ground.
AEDO's engineering apps help professionals work faster and more accurately on Philippine projects.
Statutes, codes, official tools and references used or referred to in this article, linked to their source. Links open in a new tab.
Prices, cost bands and rate figures in this article are AEDO Construction's own market and practice figures for Philippine work unless a source is named beside them. Code and statute references above link to the primary text.
AEDO Construction handles your project from design to turnover — one team, one contract, full accountability. We've built two-storey residences, commercial buildings, and specialized structures in Negros Oriental, and designed them nationwide, with transparent pricing and NSCP-compliant design.